


Tech: An Introduction to Field Recording
 IndieAmbassador.com
Written by Matt Hines
Earlier this summer, I was doing sound design for a video game company, work which involved going out into the city to capture source material to use as the basis for my projects.
Applications
This presented a conundrum of the ‘how should I go about this?’ type. Recording in the field can be applied to live gigs (where legal), band rehearsals — uploading impromptu recordings/videos of your band is a great way to connect with fans – interviews, on-location podcasts, capturing great sound effects and everything else in between.
Though ideal, transporting one’s entire studio setup would be simply impossible for the majority of field recording that takes place. Even in situations where we might have the luxury of a power supply or even a table to set it all up, such as a venue, it just wouldn’t be practical. The answer of course, is to use a portable recorder. Not only this, but with a plethora of audio software aimed at cleaning up the undesirable elements encountered whilst recording in the field, you are well on your way to some great audio experiences. It sounds expensive, but is it?
Affordability
Thankfully for all indies out there, this solution proves extremely cost effective and affordable, with even the low end solutions creating fantastic results. I’m not even talking about small project-studio style portables with onboard effects and mixing capabilities, but rather handheld devices meant simply for use in sound capture, since you can do all the editing once you get back to your computer. If you do a quick search of any major music retailer, like Guitar Center and Sweetwater for instance, you’ll find these devices for anywhere between $100-300. Worth noting is the fact that some of the larger companies only stock certain brands, and as such carry a smaller selection leading to less of a choice. In this case, the Internet is your friend!
Things to Consider When Purchasing
Certain decisions you should make whilst purchasing a portable recorder depend on the intended purpose. Are you trying to capture an entire band, or just yourself? Do you need a lot of the included features, or just the basics? If for instance you are working with any form of audio for visual media, you’ll want to ensure your portable recorder is capable of at least 48KHz. Most come with a stereo pair mic setup, perhaps with variable angles, but some add video recording capabilities, have up to five microphones in different arrangements and even XLR inputs with +48v for plugging in your own microphones. Typically, the included SD cards are small and of poor quality, so you’d want to invest in a larger card if you think you’ll be doing longer recordings. With that said, if you can manage without the full quality audio files, many recorders will record to and encode MP3 files as well. Make sure it is compatible with your operating system, though most will be universal.
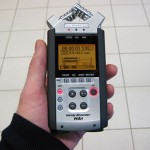 If we pause for a moment and recognize there are many solutions out there that could be right for you, I’ll then proceed with a mini-review of the one I own, the Zoom H4N. Though definitely on the higher end of the prosumer budget, this thing has more than paid for itself in my experience, and is often the gadget of choice for significant professionals too. The following is a great example of audio quality from the onboard microphones, as well as some serious street cred for field recording thanks to Richard Devine‘s Field Recordings from Teufelsberg Listening Station Berlin, Germany. Not only does it come with these two onboard adjustable microphones, but it has two XLR/TRS combo inputs and supports up to four channels of simultaneous recording anywhere up to 24bit/96KHz. You may take it for granted at the very least they’ll be capable of 16bit/44.1KHz since this is CD quality.
 Other key features include the ability to slow down/speed up and replay audio files on the fly (I use this as a practice tool), the add marker feature, whereby you can bump the record button in the middle of recording to drop a marker that will be read by your audio software upon import (incredible time saver). Durability certainly isn’t a problem with this device, since I dropped it from quite a distance on only my second day of ownership and it still works with no problems whatsoever. Though it does have an ‘efficient mode,’ one down side is the battery life, which is pretty poor when using +48v. The unit does respond noisily to handling, which can be frustrating, but not insurmountable and when using it as an audio interface the noise floor is elevated.
General Tips
Whatever device you do end up purchasing, please be patient and take the time to familiarize yourself with it. Experience will teach you how to get the best results specific to your purpose.
A few words of advice:
1) Always monitor your input, because without setting the correct recording levels, you may be stuck with distortion, wind noise and even operator noise (if you handle the device in a certain way whilst recording). This is key! I’ve freelanced as an audio restoration consultant, a position that would never be necessary if due care had been shown in recording to begin with.
2) Pay close attention to battery life, since it can run down fast. Should you lose power in the middle of recording, you’ll probably lose your entire audio file.
3) Don’t just set it up and hope for the best. Experiment with mic position and really see how you might get the best sound for your environment.
Editing
So you’ve collected a whole library of different recordings, and now are back at your computer. What next?
There are a great many tools out there designed specifically to help you edit audio. Bias Peak Pro and Sony Sound Forge are two commonly used ones, for Mac and Windows respectively. These and all the common DAWs (Pro Tools, Logic, Ableton, Cubase) not only possess the tools for performing the basic audio editing tasks, but often the more advanced, too.
Noise Reduction
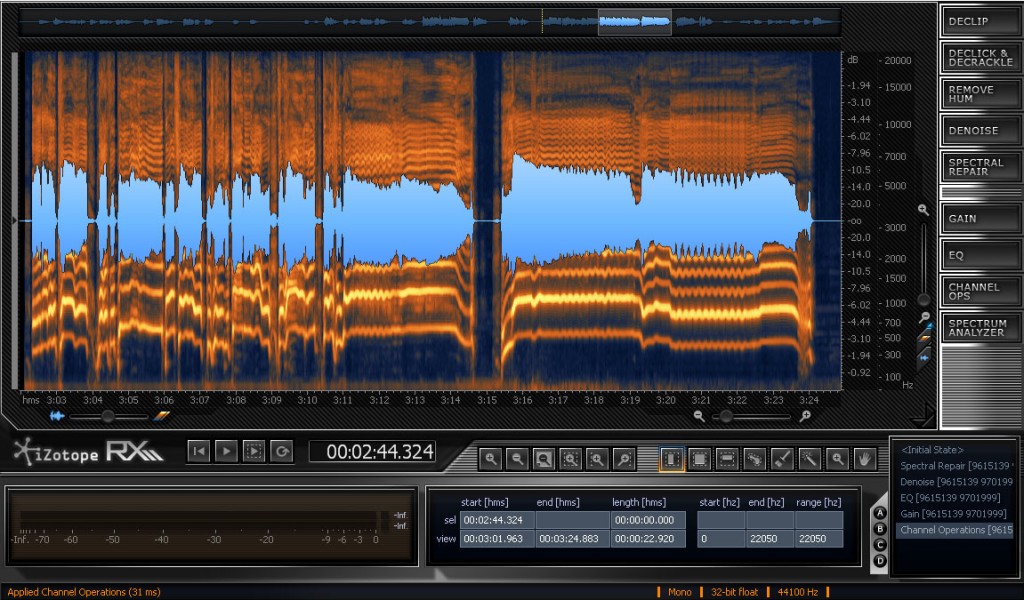
You might have a great deal of noise in your recording, or background noises that interfere. These days, technology is out there (again, for only a few hundred dollars) to enable you to reduce elements like this. It is used day in and day out by everybody who records in the field simply to clean up and better present their audio recording(s). First, I’d recommend using anything you may have, even EQing, just to get a feel for how you might go about polishing up your audio, since even the best tools are useless in the hands of the clueless. Then, if your program of choice doesn’t come with any noise reduction tools, or even if it does, check out some third party tools. iZotope’s RX2 is a brilliant example. If you have a moment, check out this video and you’ll see what I’m talking about.
As with any software, if there exists a trial version, then I’d highly recommend taking advantage of it. Then if it does prove useful I’d strongly urge purchasing versus downloading a cracked version – not only do you get the support and the updates, but the tools are becoming very affordable for the everyday musician.
Most important – get out there, and have fun!
- Matt
Reader Comments (2)
Now that is one staggeringly DEEP picture - if that's all you posted I'd be grateful!
But thanks, Matt, for a real heads-up article, too!
I also use a Zoom H4n and had the same problems with battery life. I can highly recommend Sanyo Eneloop rechargeables to solve this- they just seem to last forever!